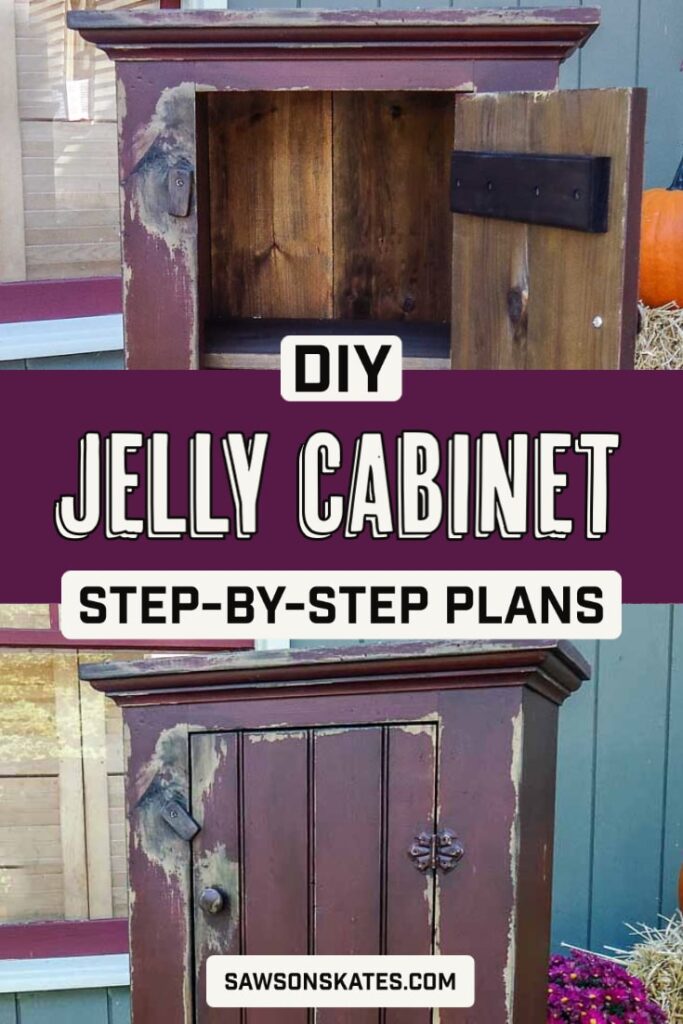
DIY Vintage-Style Jelly Cabinet (Functional & Nostalgic)
Add a touch of vintage charm to your home’s decor with this DIY jelly cabinet! Learn how to make your own with this step-by-step tutorial.
Looking for a way to bring the warmth and nostalgia of the past into your home? Transport yourself back in time with this DIY jelly cabinet that looks like it came straight out of a vintage magazine!
This modern take on a classic embraces the charm of a bygone era while offering plenty of storage. It’s simple to build with a few basic tools and these easy step-by-step plans.
Originally published November 3, 2015, updated July 26, 2023.
Table of Contents
- Inspiration for this DIY Jelly Cabinet
- What Tools Do You Need?
- What Wood Should You Use?
- How to Make a DIY Jelly Cabinet
- Get the Free Plan
This article contains affiliate links. If you purchase from these links, I may earn a small commission at no additional cost to you. Visit my site policies for more information.
Inspiration for this DIY Jelly Cabinet
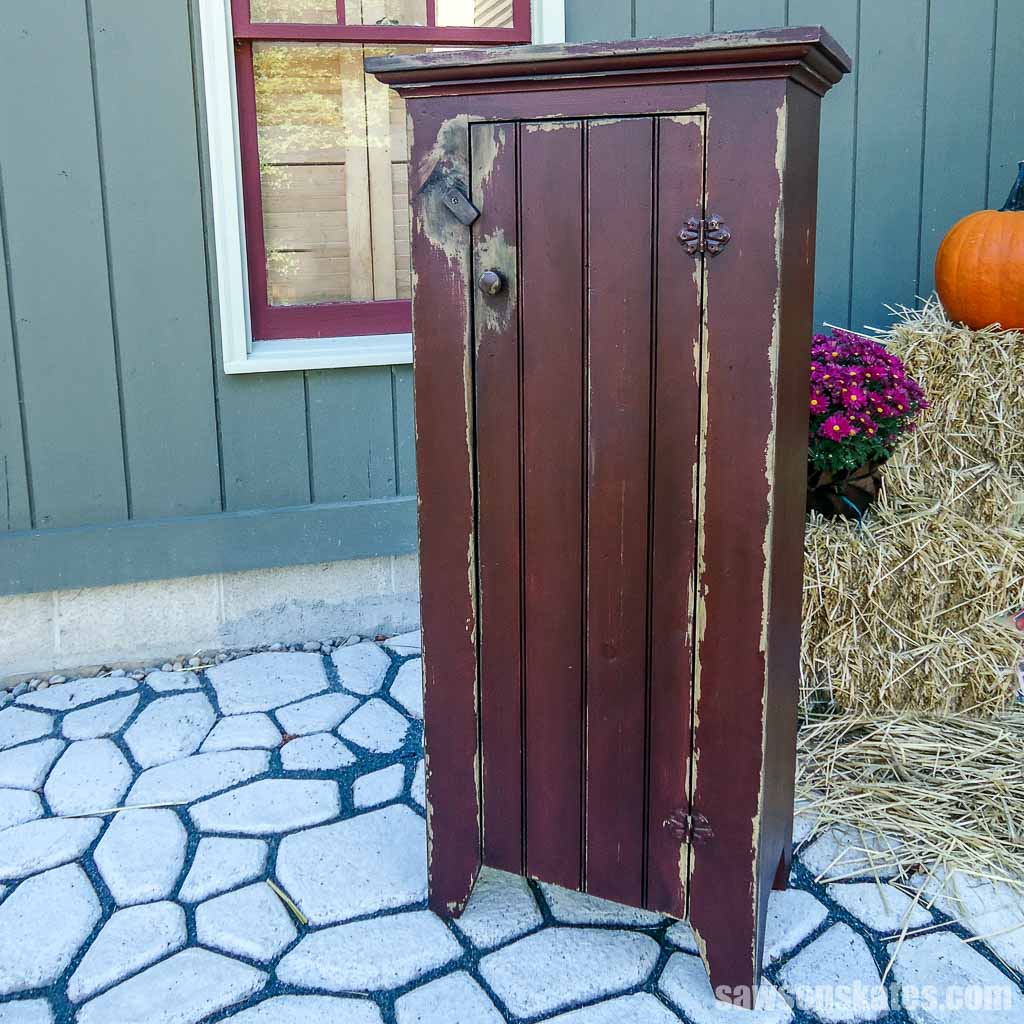
Jelly cabinets, sometimes called jelly cupboards, were popular in the 1800s to store homemade jams and jellies. The cabinets were often placed in the kitchen, but they could also be found in dining rooms or other areas of the home.
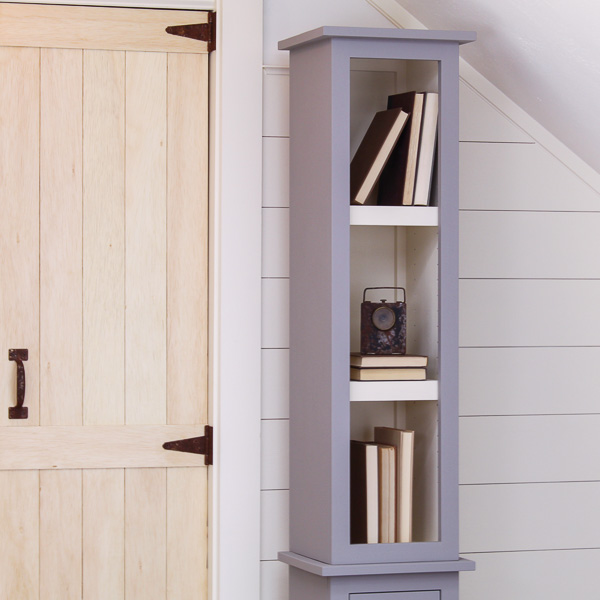
Today, you can still use these cabinets to store jams and jellies, but you can also store kitchen supplies such as spices, coffee, tea, and other dry goods or kitchenware like bowls and dishes. You can also use them to display books, artwork, and framed photos.
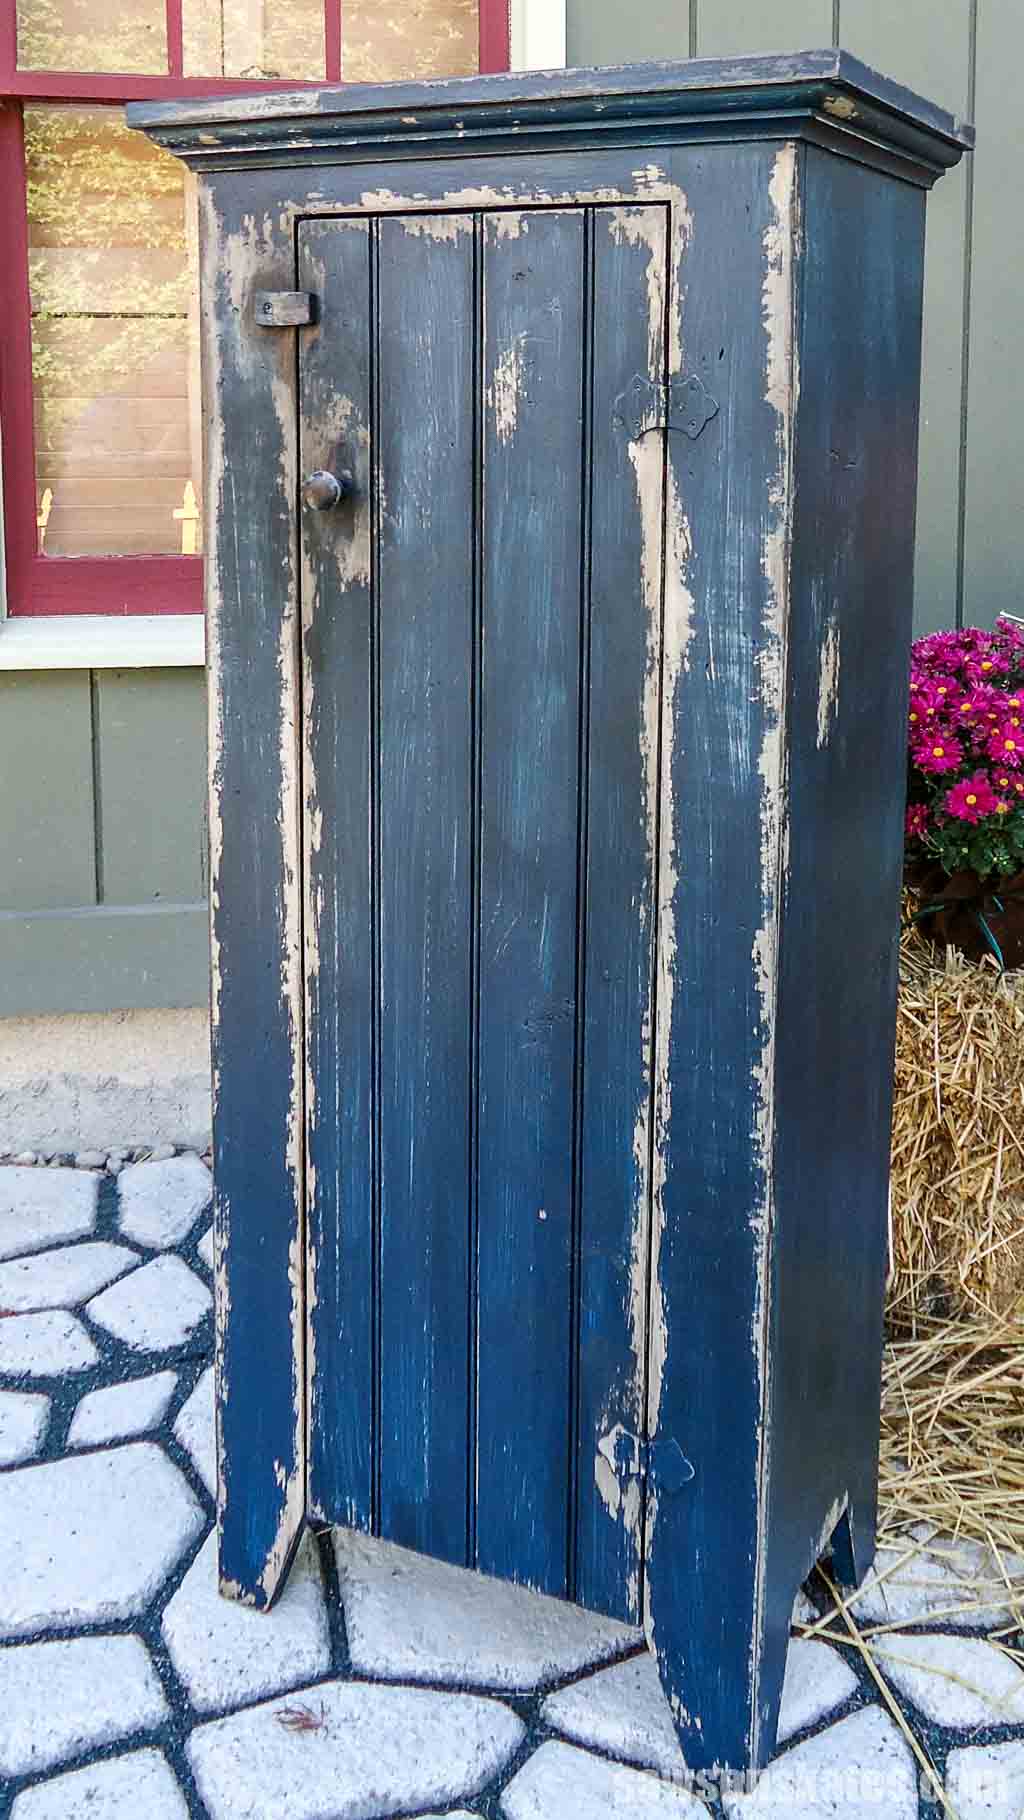
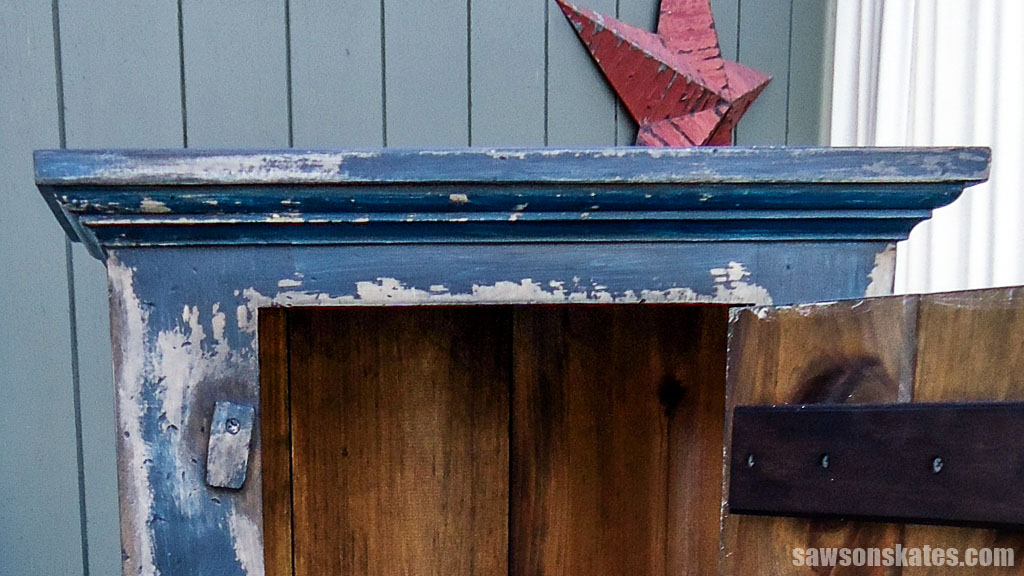
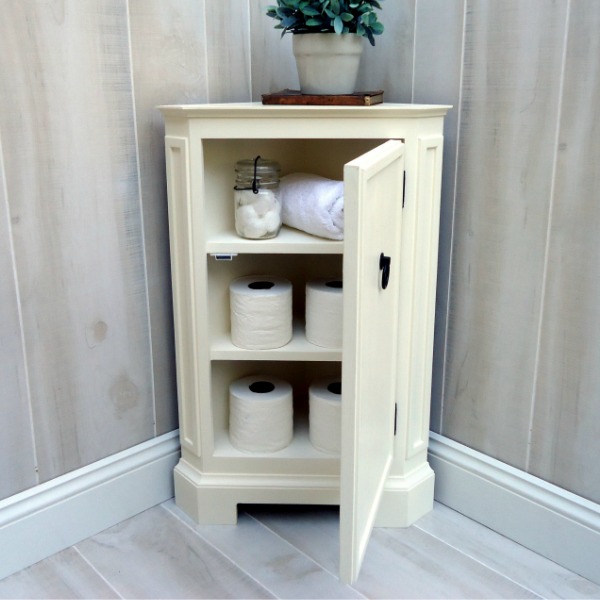
My aunt uses the blue jelly cabinet I made in this tutorial to organize her bathroom towels, linens, and toiletries. These cabinets are also excellent for displaying craft show or vintage shop items.
What Tools Do You Need?
You can make this DIY jelly cabinet with just a few basic tools. Here’s what you’ll need:
Sliding Miter Saw
This project is made with 1×12 boards which measure 11-¼” wide. Many sliding miter saws can cut this width in a single pass. You’ll need to cut these components with a circular saw and a crosscut jig if you don’t have a sliding miter saw or one with this cutting capacity.
Related: Miter Saw vs Circular Saw (Differences + Which to Choose)
Jigsaw
I used a jigsaw to cut the cabinet’s feet.
Circular Saw or Table Saw
You’ll need to rip several parts to width, such as the top, bottom, shelves, back, and possibly the door parts. A rip cut is the process of cutting a board along its length, making it narrower.
You can rip the parts using a circular saw and a Kreg Rip-Cut or a table saw.
Related: Table Saw vs Circular Saw (Which Should You Buy?)
Pocket Hole Jig
I used a pocket hole jig to assemble the cabinet’s parts.
Drill
Using my drill, I made the pocket holes and drove the pocket hole screws to connect the parts.
Shelf Pin Jig (optional)
I made my cupboard with fixed shelves, but you can add adjustable shelves instead.
Adjustable shelves are:
- A great way to maximize your project’s storage space.
- Allow you to adjust the height of the shelves to accommodate different items.
- Keep your cabinet organized and clutter-free.
To install adjustable shelves, you will need to drill holes in the cabinet’s sides using a shelf pin jig. Once you’ve made the holes, insert the shelf pins and add the shelves.
Related: How to Use a Shelf Pin Jig
Brad Nailer (optional)
I used a brad nailer to attach the cabinet’s back panels, but you could use a hammer and nails instead.
What Wood Should You Use?
I designed this cabinet so you could easily make it with off-the-shelf pine boards such as 1×3s, 1×4s, 1×12s, and beadboard planks.
Related: Beginner’s Guide to Wood Sizes
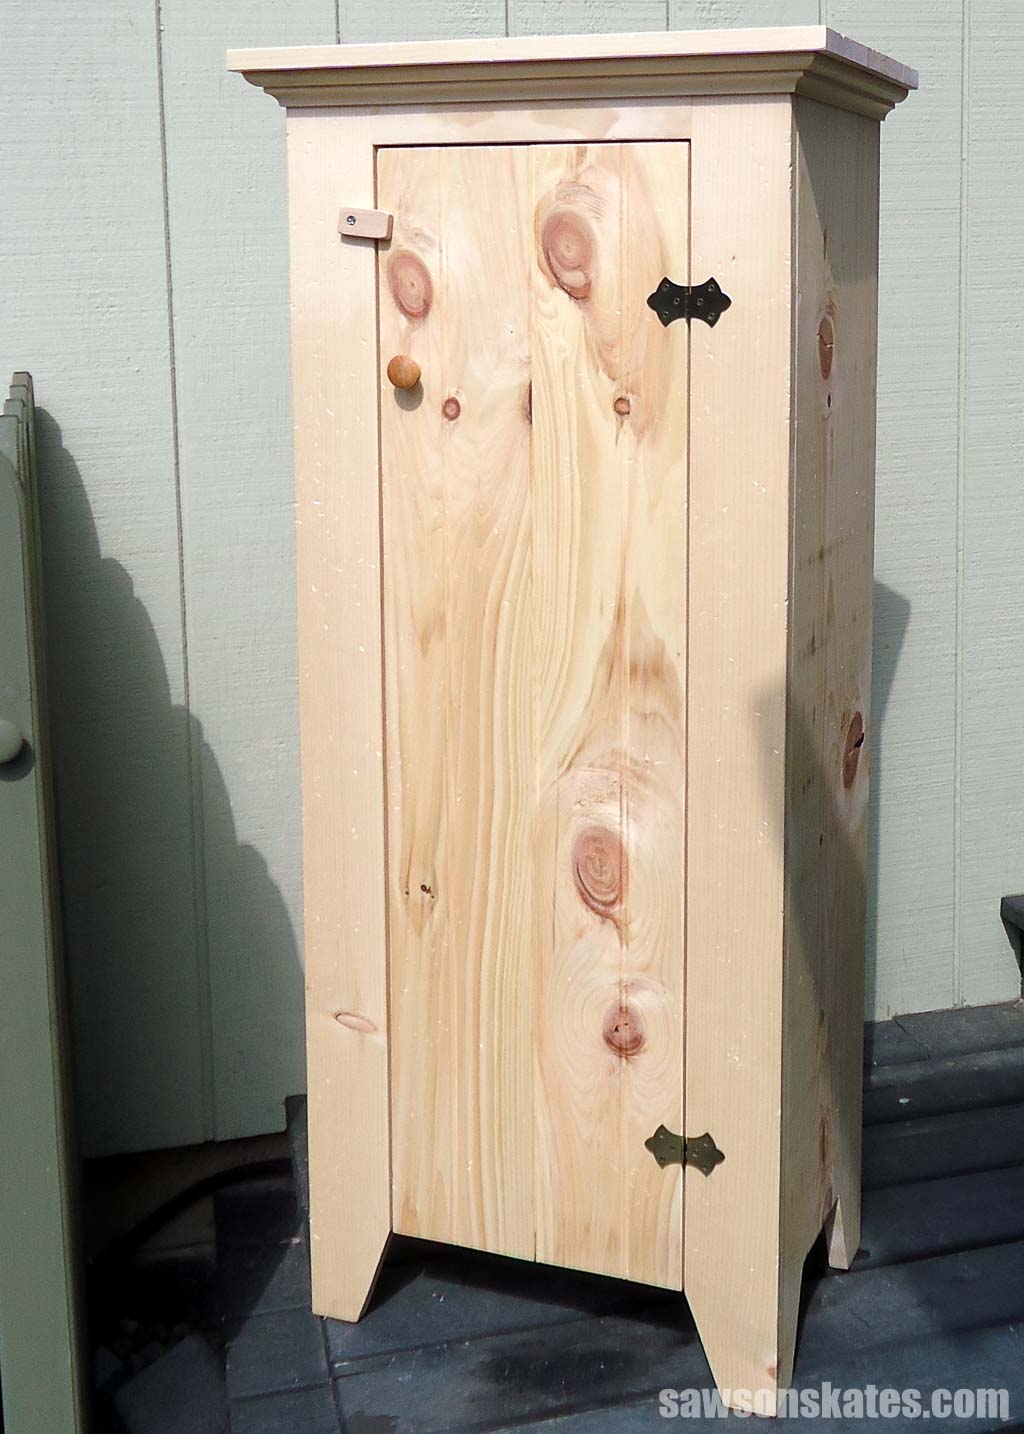
I also used bed molding to add a decorative detail to the top of my cabinet.
Customize Your Jelly Cupboard
I designed this cabinet with a beadboard door, but you can easily customize it to suit your style.
Here are a few ideas:
- Use a solid wood door for a more rustic look.
- Use a frame and panel door for a more tailored look.
- Leave the door off for an open bookcase.
- Add a curtain instead of a door for a more decorative touch.
The possibilities are endless!
DIY Vintage-Style Jelly Cabinet
Printed Plan
Get the FREE plan here (includes detailed instructions, measurements, and bonus tips)
Supplies
- Wood (per the printed plan)
- 1-¼” Coarse-Thread Pocket Screws
- 1-¼” Wood Screws
- 1” Brad Nails
- 1-¼” Brad Nails
- Washers
- Wood Glue
- Knob or Handle
- (2) Vintage-Style Surface Hinges
Tools
- Tape Measure
- Drill
- Kreg Jig
- Kreg Multi-Mark
- Sliding Miter Saw
- Circular Saw or Table Saw
- Jigsaw
- Brad Nailer or Hammer
- ¼” Drill Bit
Step 1. Make the Sides
Cut two pieces of wood to length for the sides.
Use the diagram in the printed plan to mark the location of the legs.
Then use a jigsaw to cut the area between the front and back legs.
Use the diagram in the printed plan to mark the location for pocket holes along the front edge of each leg. You’ll use these holes to attach the sides to the face frame in Step 5.
NOTE: Be sure to make a left and right side.
Then drill a pocket hole at each mark.
Related: How to Use a Pocket Hole Jig (& Beginner Pitfalls to Avoid)

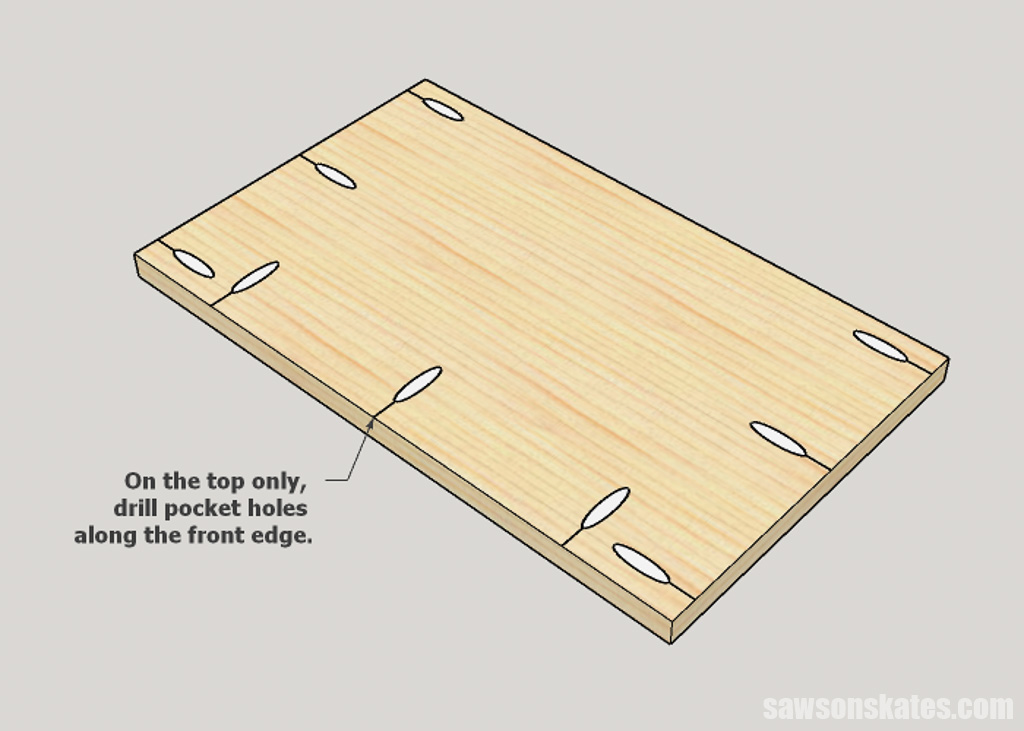
Step 2. Make the Top and Bottom
Cut two pieces of wood to length for the top and bottom and use a table saw or circular saw to rip to width.
Related: 21 Table Saw Safety Rules (& Mistakes to Avoid)
Use the diagram in the printed plan to mark the location for pocket holes.
NOTE: On the top only, drill pocket holes along the front edge. You’ll use these holes to attach the face frame in Step 5.
Then drill a pocket hole at each mark.
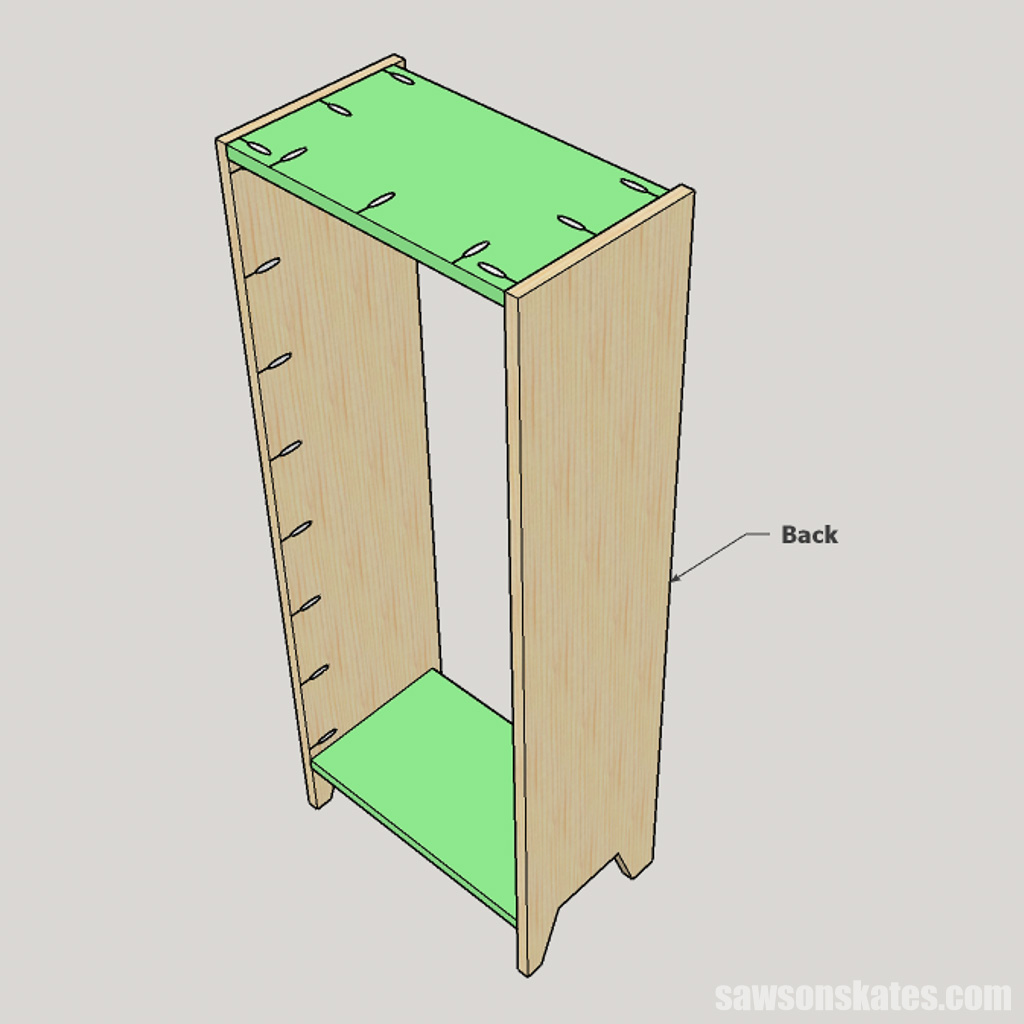
Step 3. Assemble the Case
Position the bottom so the pocket holes face down and the top so that the pocket holes face upward. Also, be sure the pocket holes on the edge of the top piece face toward the front of the case.
The bottom sets up from the bottom of the legs. To help with positioning, I recommend cutting pieces of scrap wood to length and clamping them to the bottom of the legs.
Apply glue to the ends of the top and bottom, clamp into position, and attach using pocket screws.
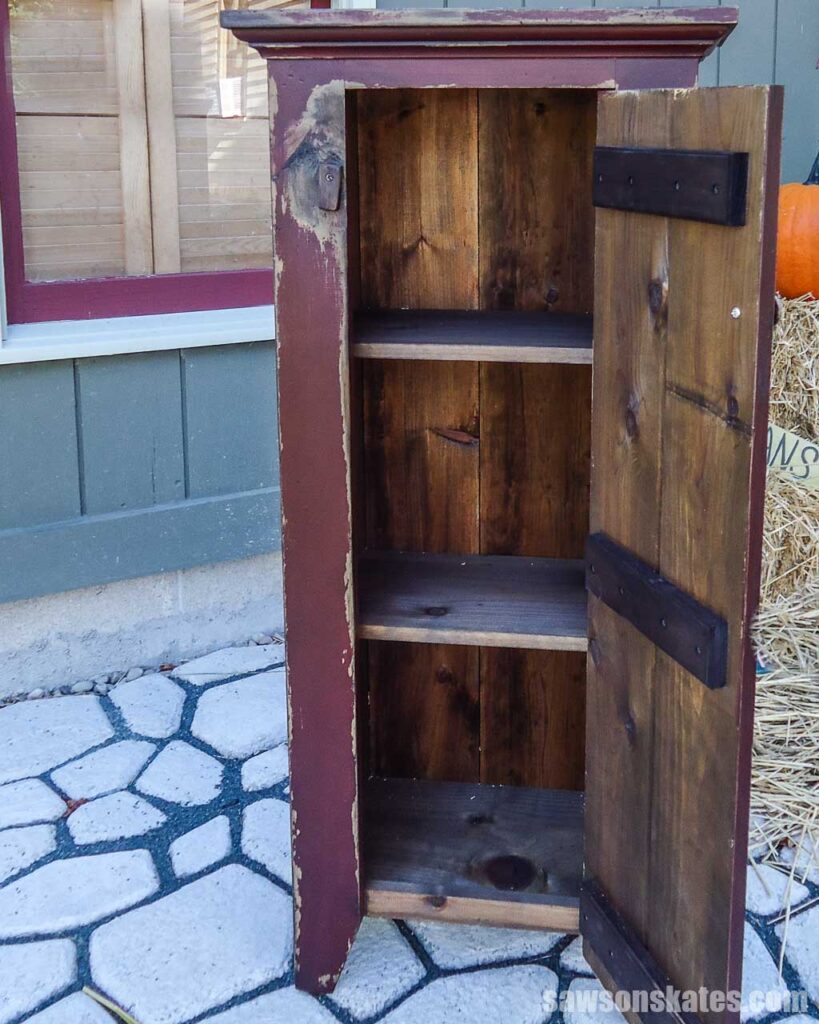
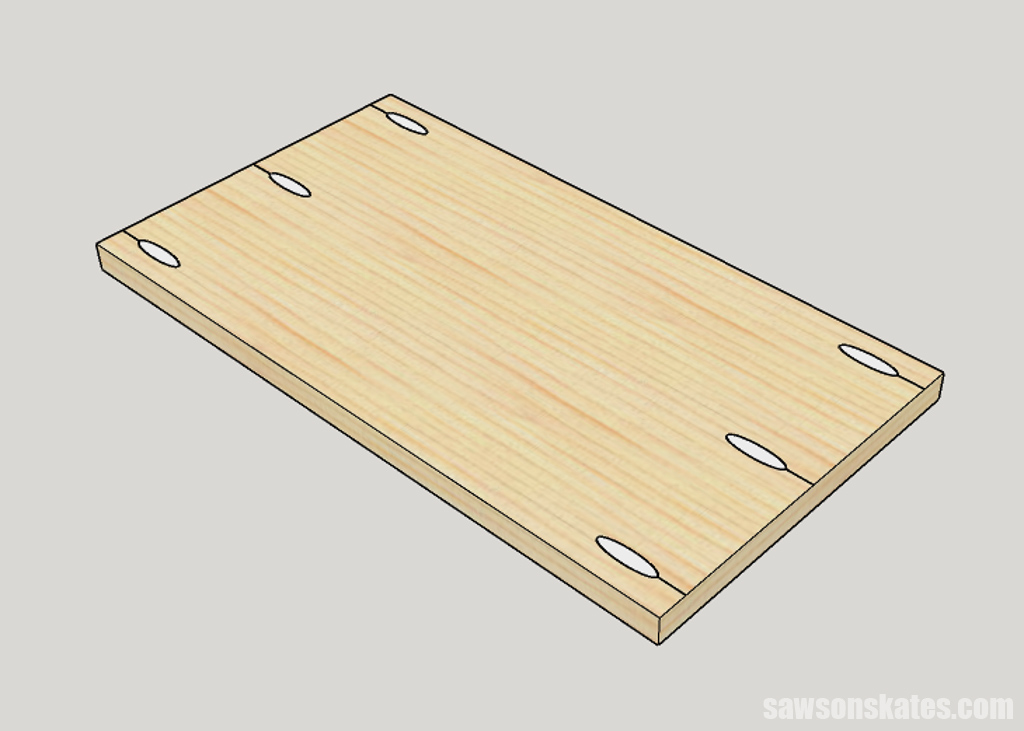
Step 4. Make the Shelves
I made my cabinet with fixed shelves, but you can add adjustable shelves. If you plan to add adjustable shelves, now is a good time to use a shelf pin jig to drill the shelf pin holes. Also, I recommend cutting the adjustable shelves shorter so you’ll have clearance for repositioning them.
Related: How to Use a Shelf Pin Jig
Cut two pieces of wood to length for the shelves and rip to width using a table saw or circular saw. Then, drill pocket holes on each end of the shelves.
Related: 4 Ways to Make Straight Cuts with a Circular Saw
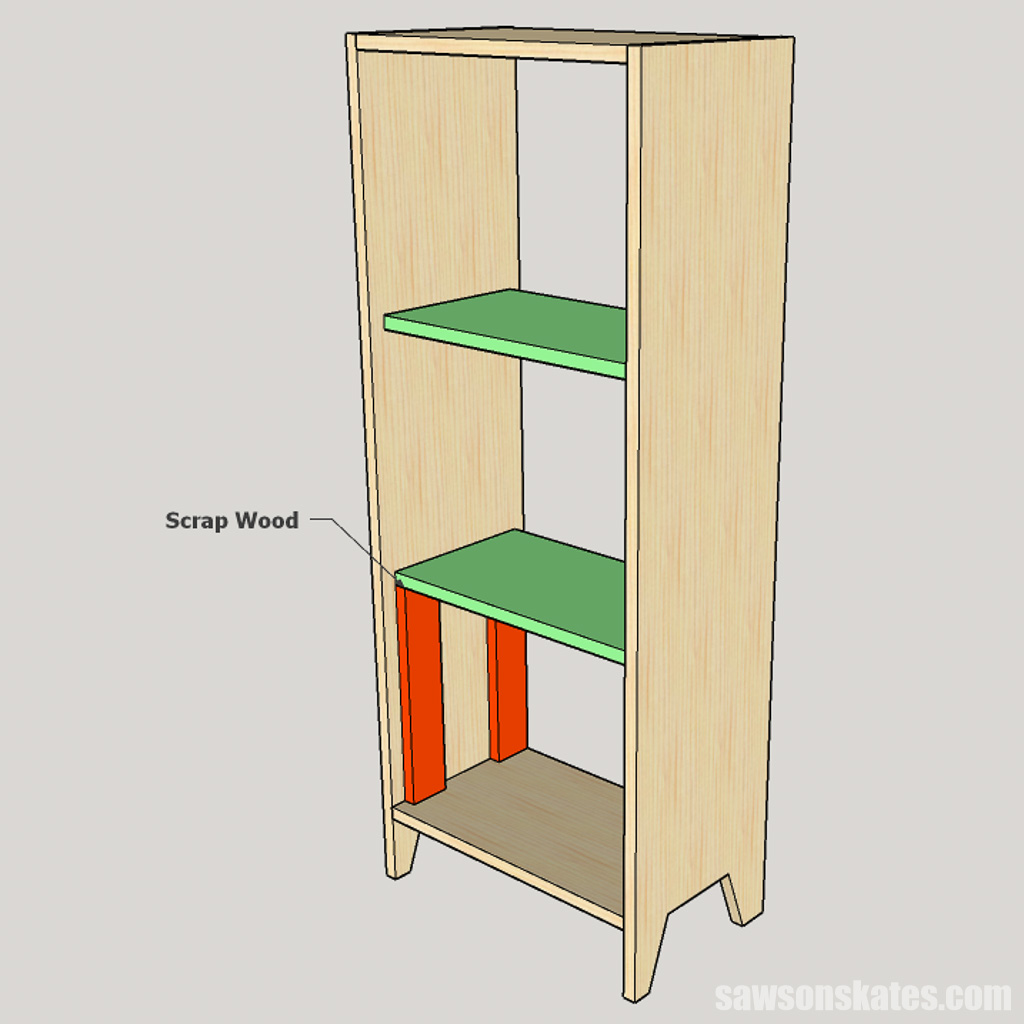
To help position the shelves, I cut two pieces of scrap wood to length. I placed the scrap wood on the bottom, then placed a shelf on the scrap wood.
Position the shelf so that it sets in from the back. It’s important to allow for this clearance because the back will occupy this space.
Also, the shelf will not be flush with the front of the case. Clamp in position and attach using pocket screws.
Place the scrap wood beneath the top, position the shelf, and clamp. Attach using pocket screws.
Step 5. Attach the Face Frame
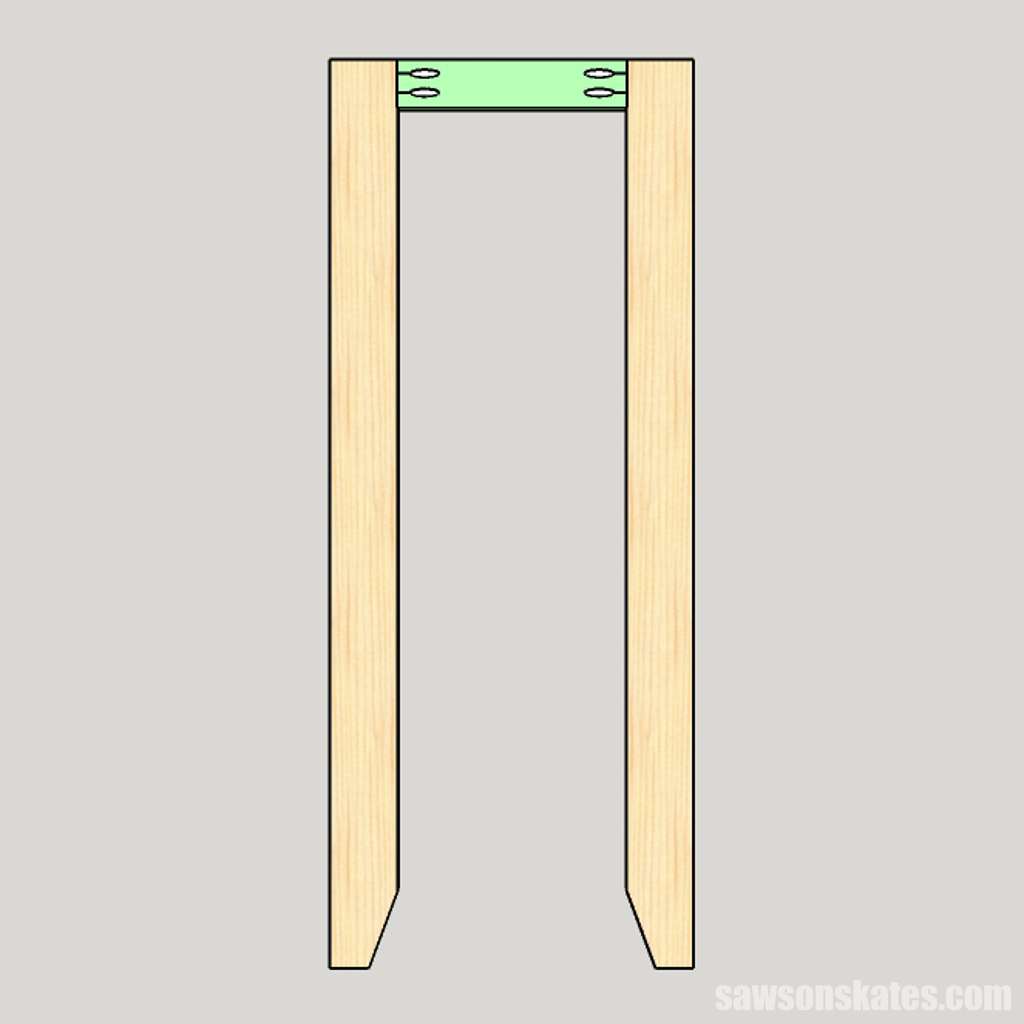
Cut one piece of wood to length for the top rail and drill pocket holes in each end.
Cut two pieces of wood to length for the front legs. Use the diagram to mark the location of the legs and use a jigsaw to remove this area.
Apply glue to the rail, clamp, and attach using pocket screws. Be sure the angles on the legs face inward.
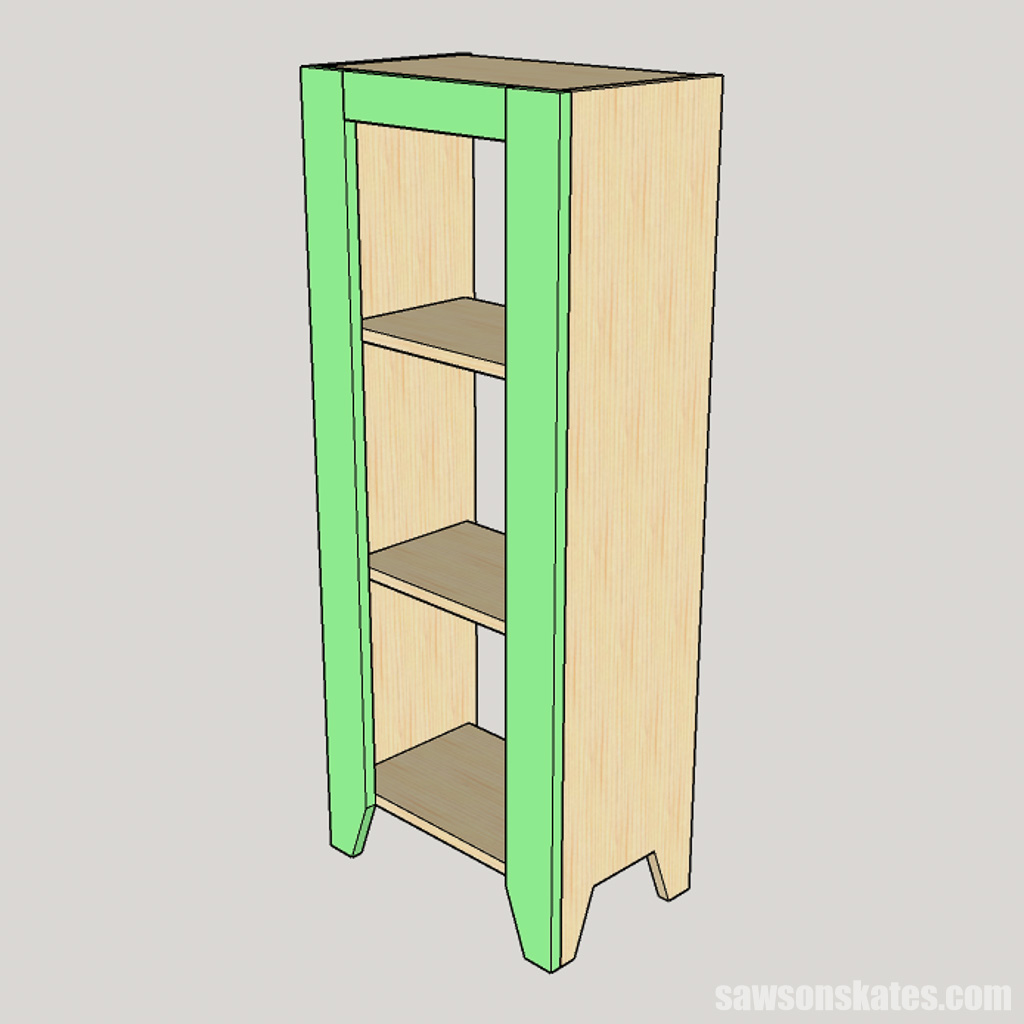
Apply glue to the edges of the side, position the face frame, and clamp. Use the pocket holes in the sides and top of the case to attach the face frame using pocket screws.
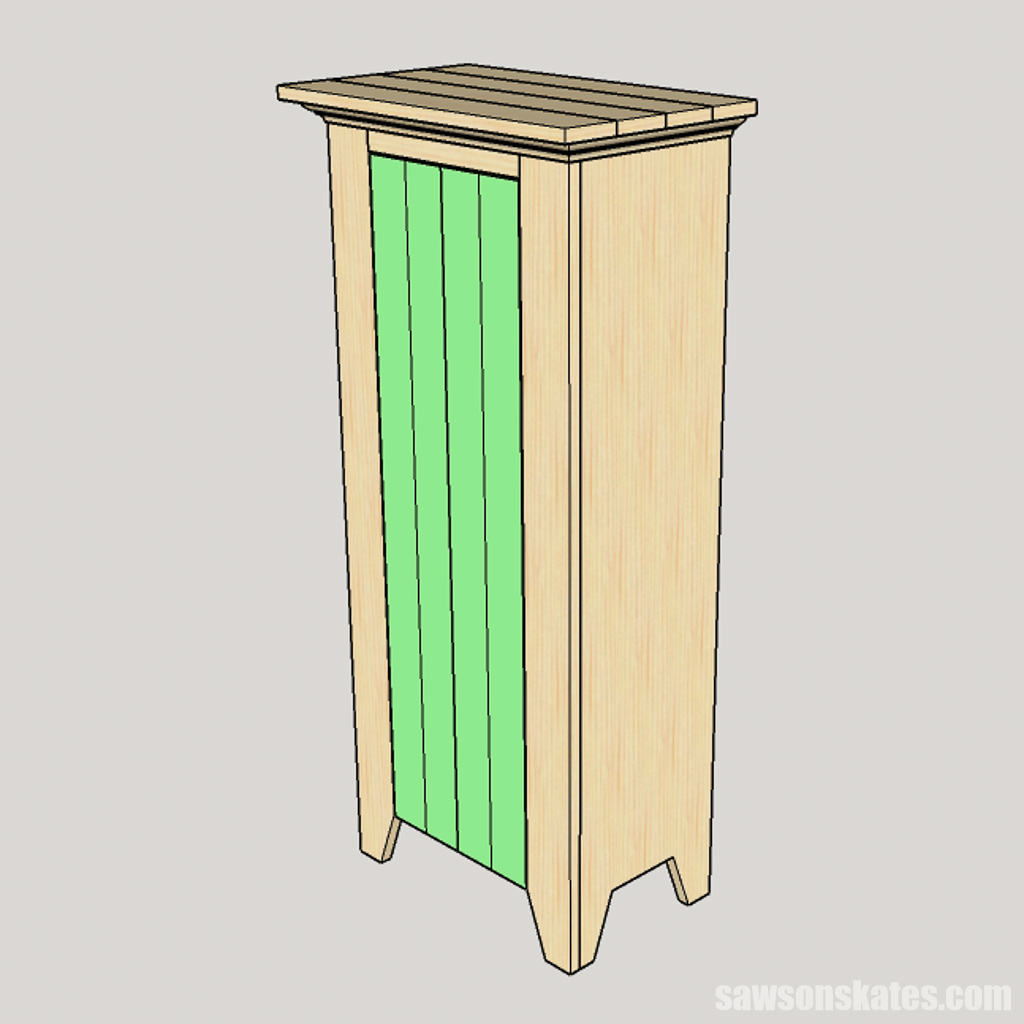
Step 6. Attach the Back
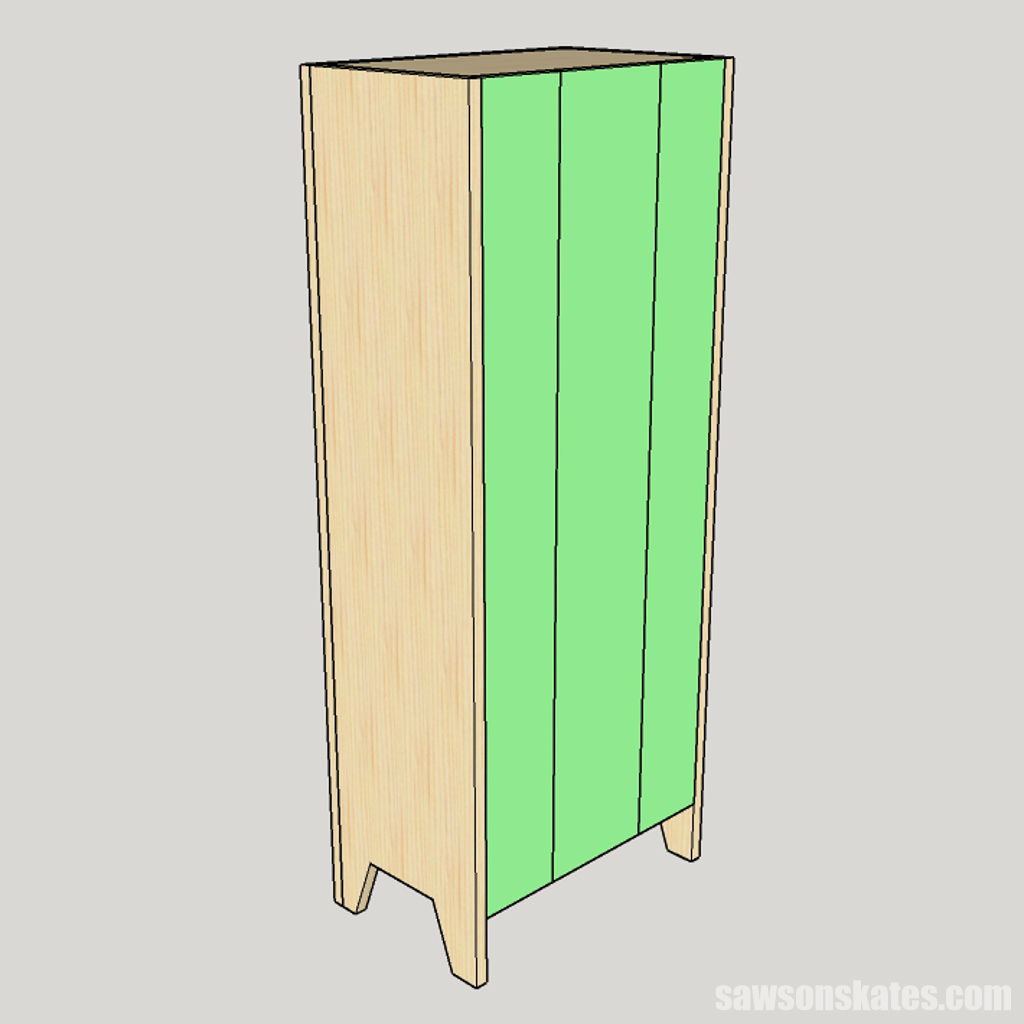
Cut three beadboard planks to length for the back.
On the back, center one plank from side to side and attach using brad nails.
Measure to the left and right of the piece you just installed, then use a table saw or circular saw to rip the side pieces to fit. Attach the remaining pieces using brad nails.
Step 7. Attach the Top
Use the diagram in the printed plan to mark the location for holes in the case’s top. You’ll use them to attach the top to the case. The holes are oversized, allowing the top to move with seasonal changes.
Related: Mistakes with Wood Can Cause Your DIY Furniture to Crack
Use an awl to make a starting point for the drill.
Related: What is an Awl? (+ How to Use It)
Then use a drill bit to make a hole at each mark.
Cut four pieces of wood to length for the top.
NOTE: You may want to adjust the length and width to make the top smaller if you won’t be using the bed molding in Step 8.
Apply glue to the edges and clamp to form a panel.
When the glue is dry, position it on the case. Attach from inside of the cabinet using wood screws and washers.
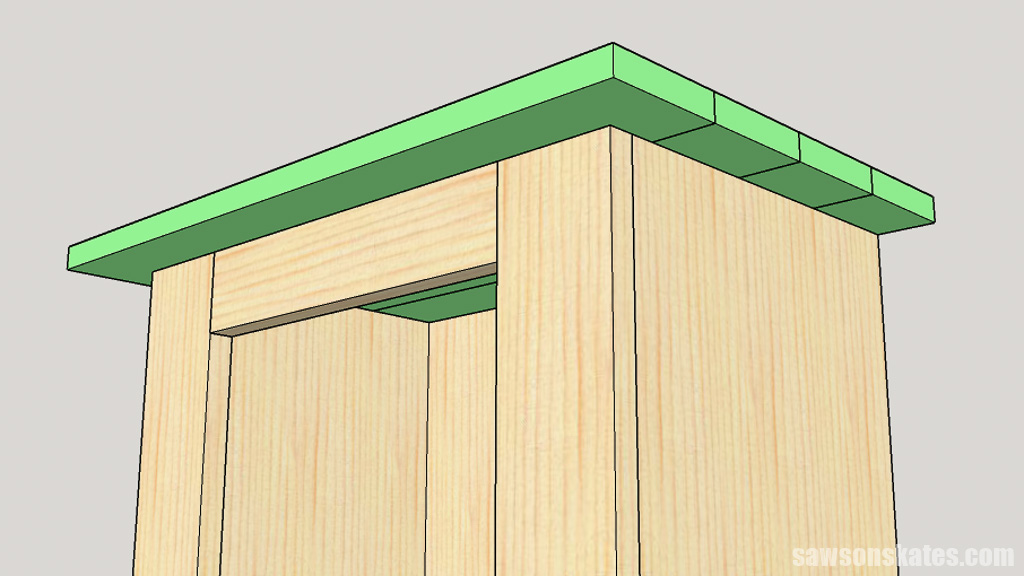
Step 8. Attach the Bed molding (optional)
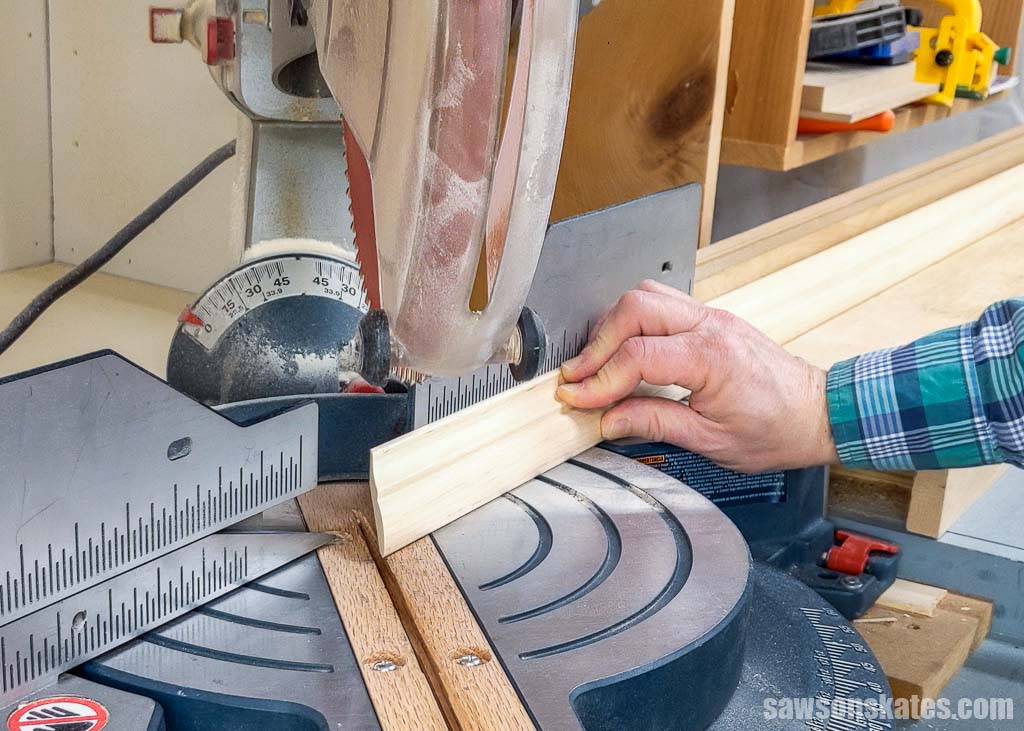
Unfortunately, I don’t have photos demonstrating how I attached the bed molding to the jelly cabinet, so I’m showing how I attached the molding to this picture frame instead.
I began by setting my miter saw to 45 degrees. Then, I placed the molding upside down, with the molding’s top against the saw’s table and the bottom against the fence, and made the cut.
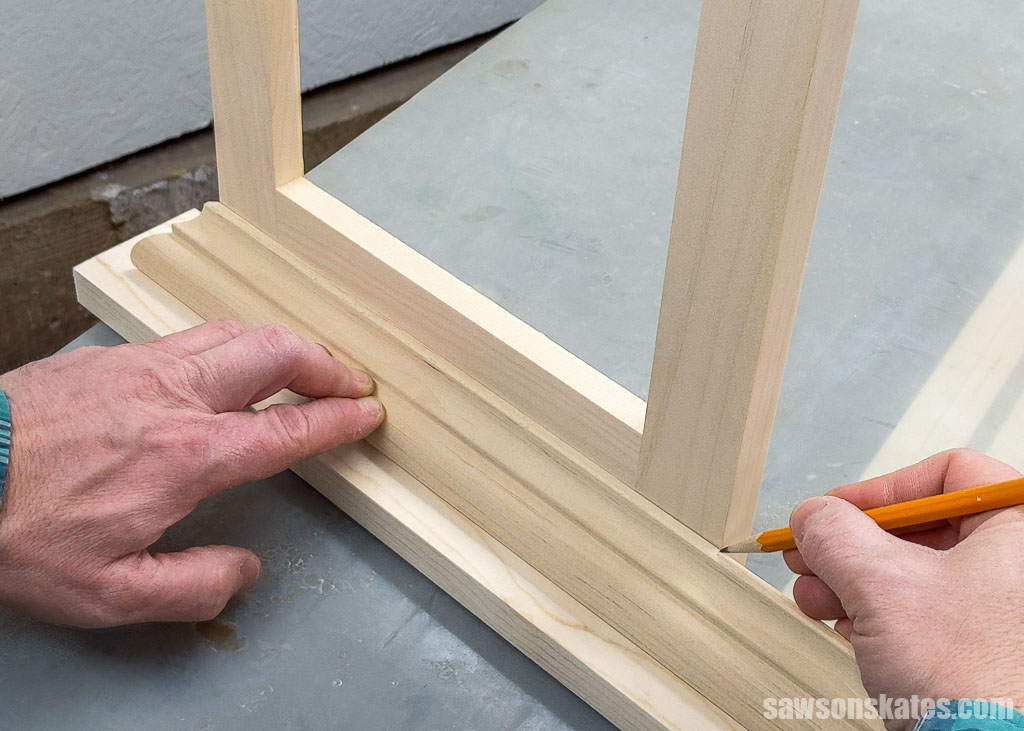
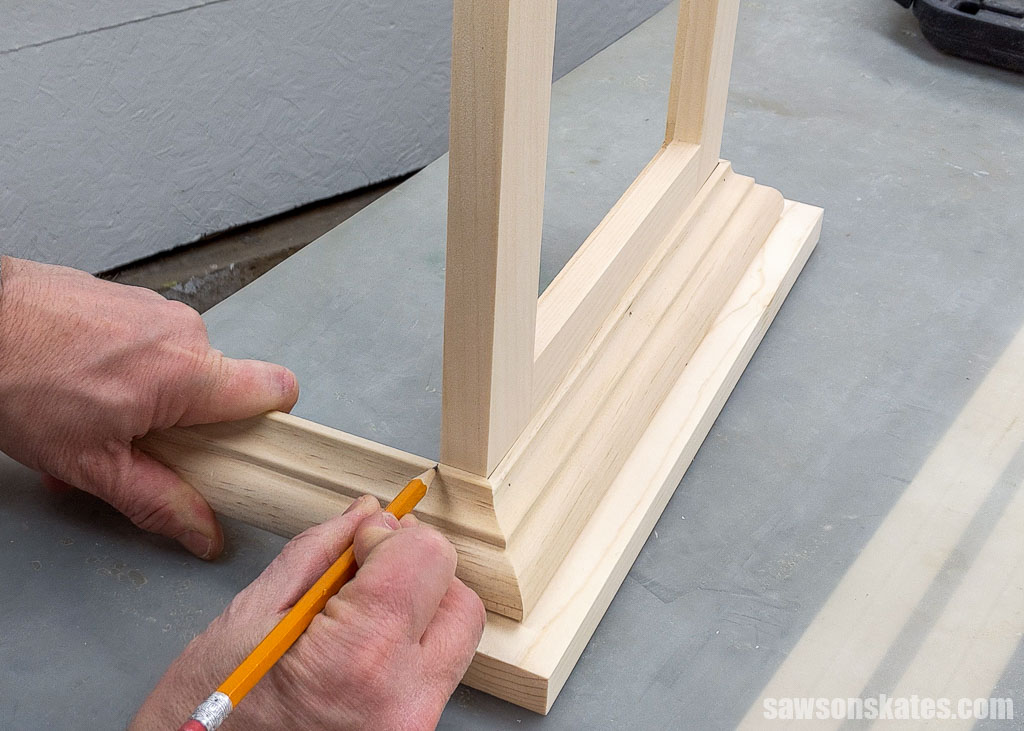
I positioned the molding’s cut edge flush against the corner of the cabinet’s side, then marked the opposite end.
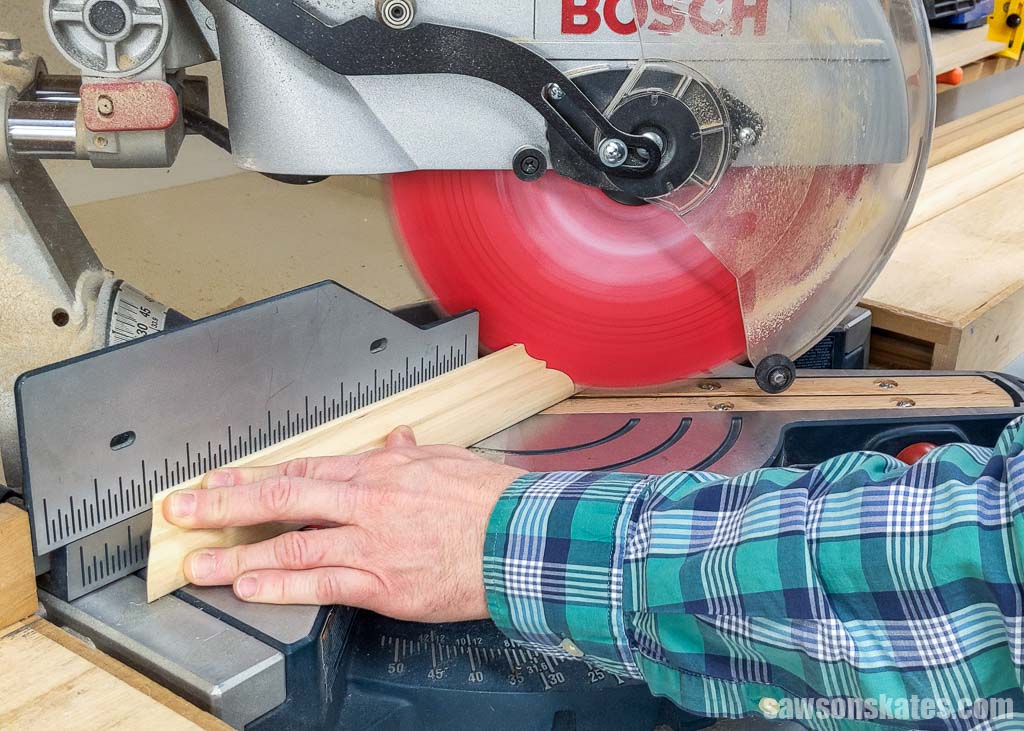
Next, I set my miter saw to 45 degrees in the opposite direction. I cut the molding slightly longer than needed to ensure it would fit perfectly, allowing me to try it on the cabinet and trim any excess with my saw.
Related: 7 Miter Saw Tricks Every DIYer Should Know
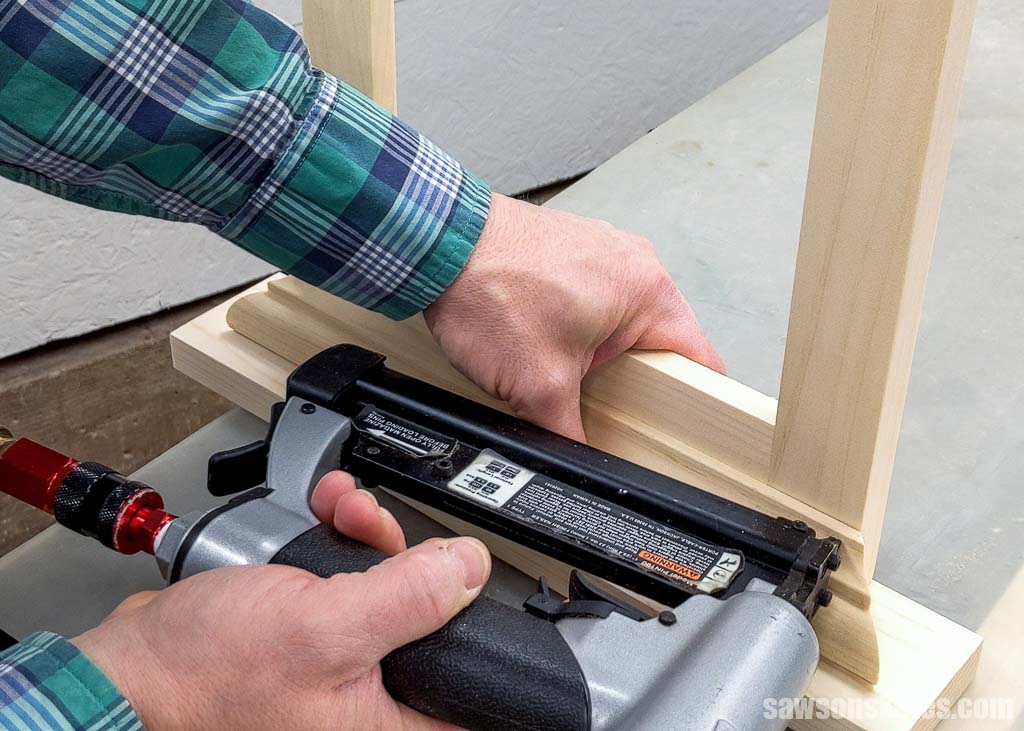
Once I was satisfied with how the molding fit, I attached it using brad nails.
NOTE: I attached the molding to the frame with pin nails, but I recommend using brad nails for the jelly cabinet because they provide a stronger hold.
Next, I cut a matching angle on the molding, placed it in position, and marked it for a straight cut.
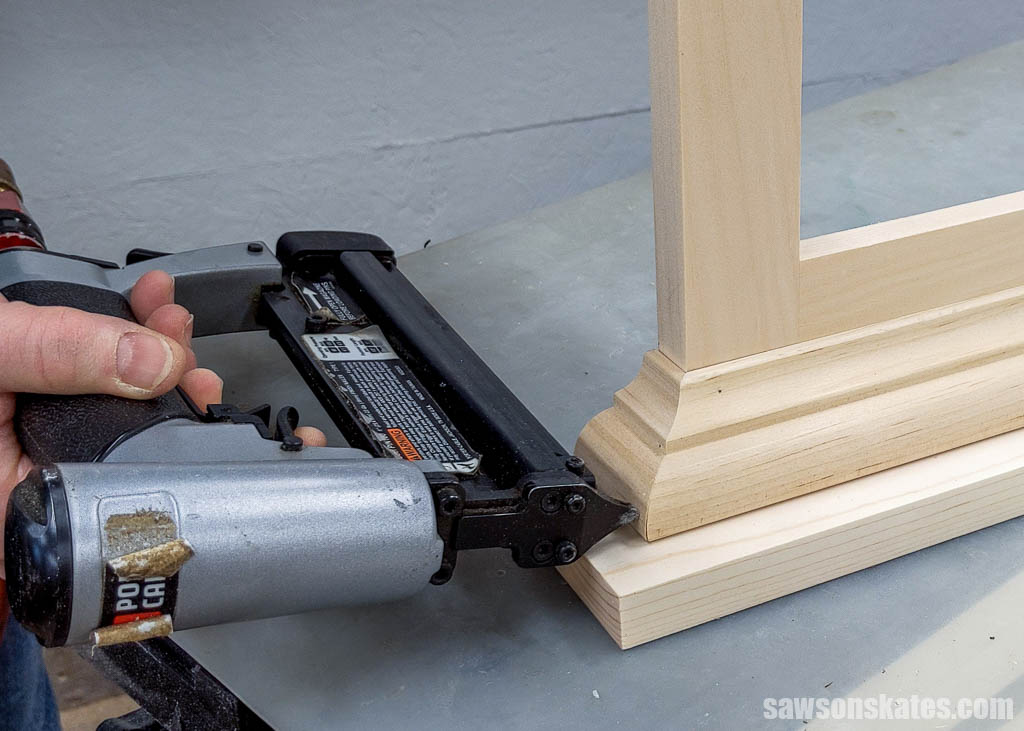
I applied glue to the molding’s angled end and attached it with brad nails. Then I repeated this process on the other side.
Step 9. Install the Door
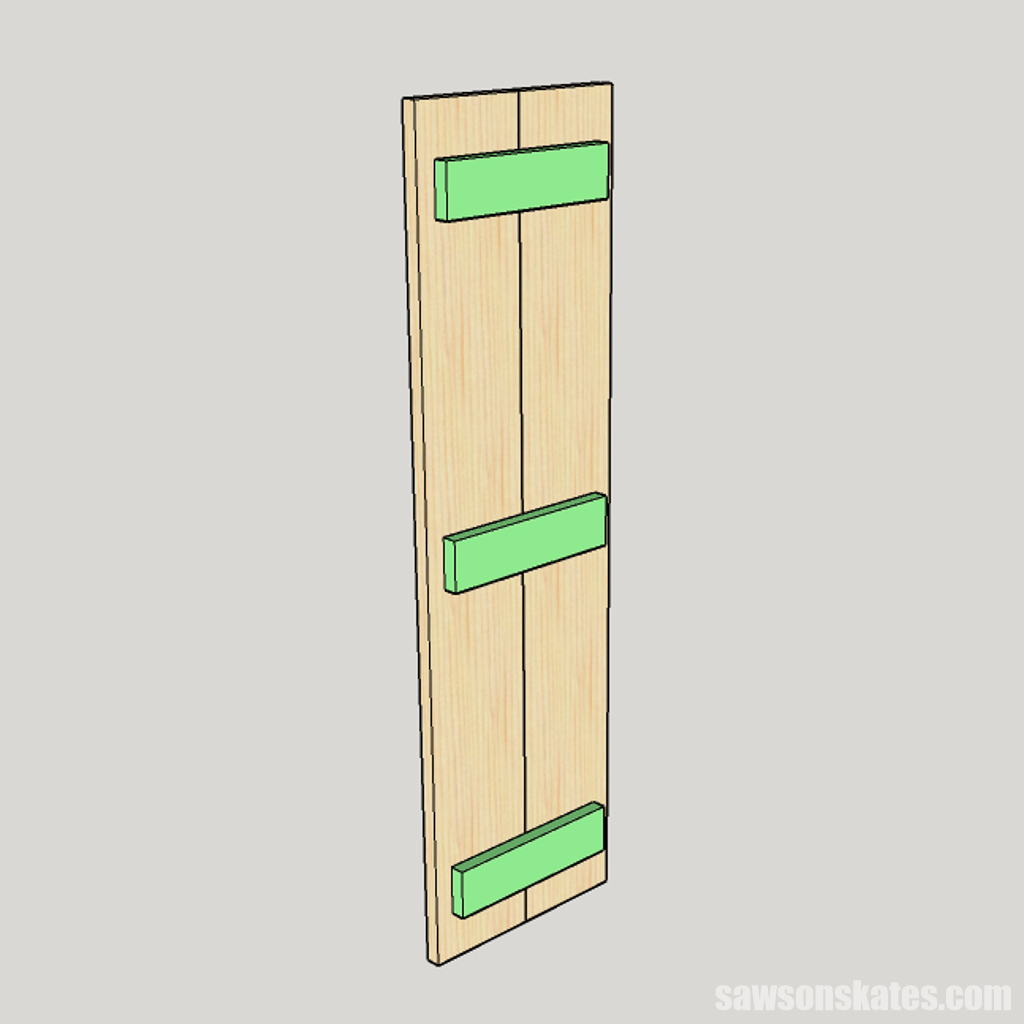
Cut two beadboard planks to length for the door. Check the height and width of your door’s opening, and if necessary, adjust your door’s measurements to allow for clearance on the sides and top. Then cut the beadboard to length and rip it to width.
Cut three pieces of wood to length for the braces. Use the diagram to position the braces on the planks, clamp, and drill countersink holes. Then attach the braces using wood screws.
Related: How to Use a Countersink Bit
Position the door in the opening. I used playing cards between the opening and the door to keep the correct spacing. Then attach it to the face frame with hinges.
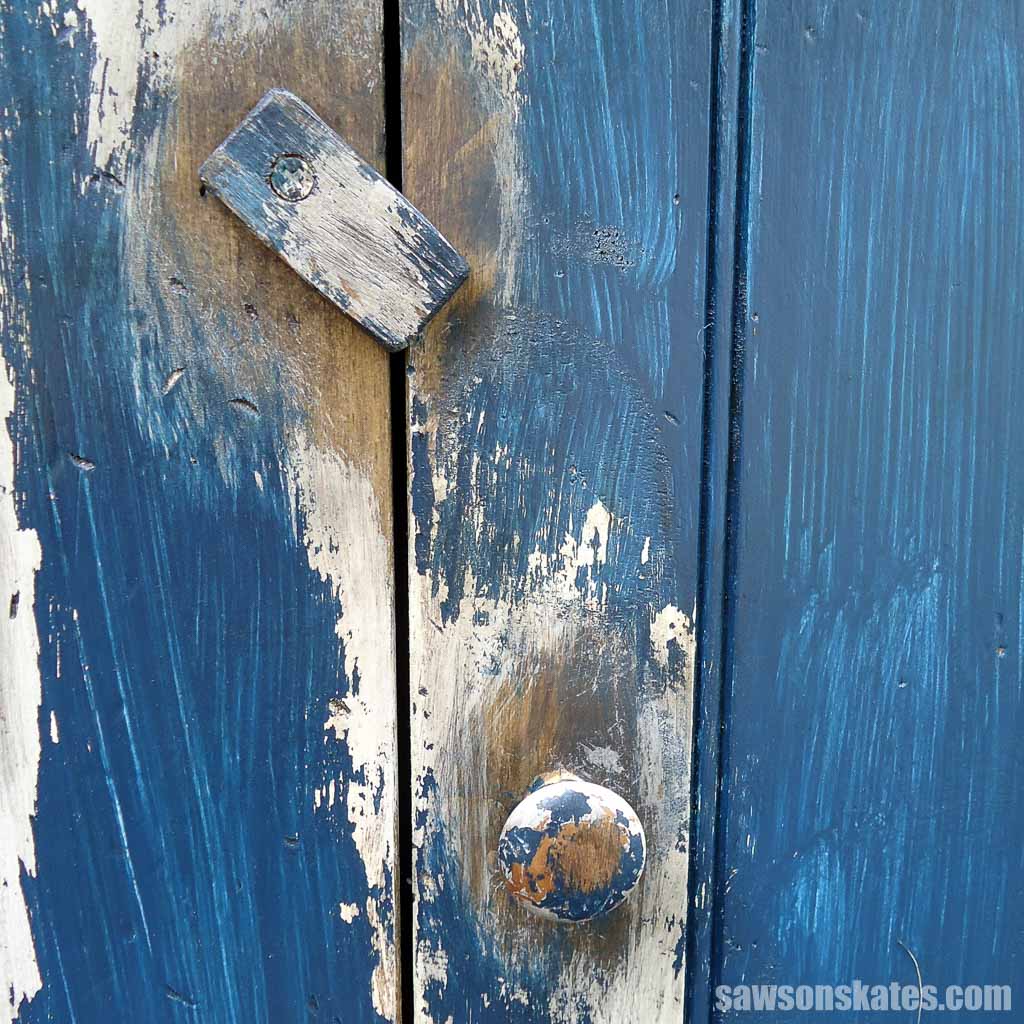
For a rustic look, you can use a piece of scrap wood or a short piece of wood for a latch. Predrill a hole and attach it to the face frame using a wood screw. Finally, install the knob or handle of your choice.
Final Thoughts
Making a vintage-style jelly cabinet is easier than you think and an excellent way to add storage to nearly any room.
Don’t wait. Get your free plan (including the detailed instructions and measurements) now!
Thank you for stopping by. If you enjoyed this tutorial, would you please take a moment and pin it to Pinterest? I’d really appreciate it!
Recommended For You

Pin This For Later
Excellent photo’s and diagrams . ……So easy, a caveman could do it.
Thank you! I try to make things as easy as possible 🙂
Wonderful cabinet! Thank you kindly for sharing your plans. I just may give this a try one day…after my 3,235 other things I have to get to. Hahaha…the life of a DIYer. Really though, this is wonderful and I can see may uses for this cabinet! Have a great day! Koko❀
Thank you for the kind words! I know what you mean… so many projects and so little time. Hope you get to make one some day. Thank you again 🙂
Shouldn’t the top/bottom be ripped to 10 1/2″ instead of 10 3/4″?
Hey Erik – Good catch! Yes, you are correct. The top and bottom should be 10-1/2″ not 10-3/4″.
Thank you, thank you for these wonderful plans!! I just finished my cabinet with a few changes and absolutely love it!! I am a 55 year old woman who has never used a power tool (other than using a drill to hang curtain rods) and I managed to complete a wonderful piece of furniture! I made it approximately 70 inches in height and used a cupboard door latch.(I know…anchor it to the wall for safety). It fits perfectly just outside my bathroom door for extra storage. You made the directions so self explanatory which gave me the confidence to tackle this project! Again, Thank you!!
Hi Vicki – Thank you for stopping by and for the compliments! I’m so glad you found the instructions easy to follow and that you love your cabinet! Congrats on starting your woodworking journey. I hope you’ll be building more projects soon!
I was 84 on 9th and I just collected wood for this cabinet. Making from pallet planks for an outside use with my DIY outside kitchen and pine bed benches. Will make one for inside use too