
Hey all, thanks for stopping by Bitterroot DIY!
For more project ideas, you can find me on Pinterest. And to stay up to date with the latest shenanigans, follow me on Instagram.
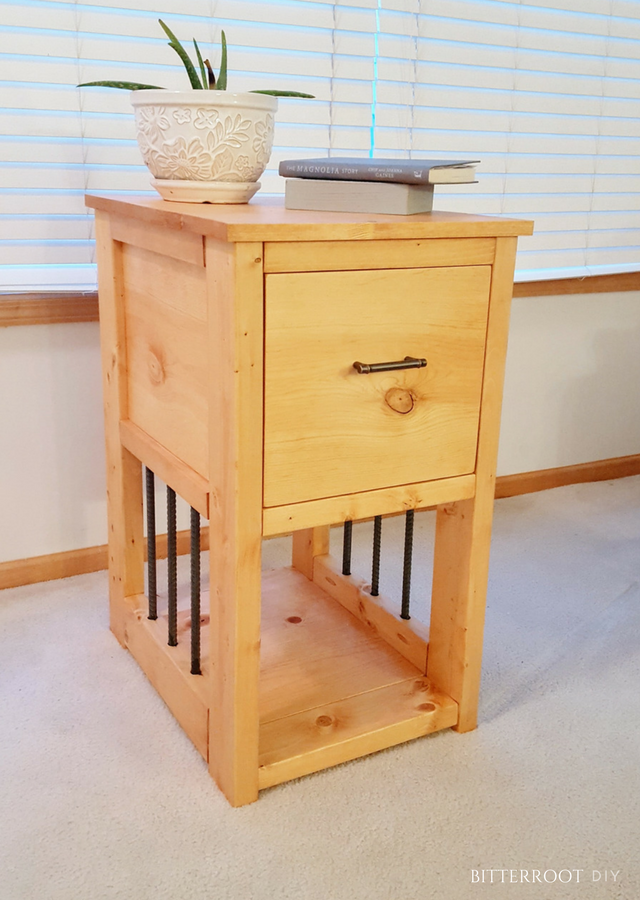
My little brother has been in need of a new nightstand for a while now, but he doesn’t have a ton of room in his bedroom. So he recently asked for a custom piece to fit the space! He gave me some dimensions and requested a large drawer for storage. Other than that, the rest was up to me!

You can download a set of plans here and/or follow along with my build below.
Lumber:
- 1 | 2×2 – 6′
- 3 | 2×4 – 8′
- 1 | 1×6 – 8′
- 1 | 1×8 – 6′
- 1 | 1×10 – 6′
- 1 | 1×12 – 6′
- 2 | 1/2″ square dowel – 3′
Cuts:
- 6 | 2×4 @ 13″ (front & back frame)
- 2 | 2×4 @ 14-1/2″ (side frame)
- 4 | 2×4 @ 29-1/4″ (legs)
- 4 | 2×2 @ 14-1/2″ (side frame)
- 2 | 1×8 @ 13″ (bottom shelf)
- 4 | 1×6 @ 17″ (top shelf)
- 2 | 1×12 @ 14-1/2″ (side frame)
- 1 | 1×12 @ 13″ (back)
Tools & Supplies:
- Miter Saw
- Jigsaw
- Orbital Sander
- Kreg Jig & Bits
- 1-1/4” Pocket Hole Screws
- 2-1/2” Pocket Hole Screws
- Drill
- Wood Glue
- Drawer Pull
- Drawer Slides
- Six 12” Rebar Pieces with ½” diameter (I found them at our local Home Depot)
Step 1.
Start by building the frame of the nightstand. Position the bottom frame 2×4 so that the top of the board is 2” from the ground.

Position the top 2×4 flush with the top of the legs.
Do not add that middle 2×4 yet. I ended up having to take it off in the next step and then re-attach it later … oops :/
So you should just have a square frame at this point.

Attach the frame pieces with 2-1/2” pocket holes and screws. I placed the pocket holes on the bottom side of the frame in order to hide them.
Step 2.
First, add the cross pieces to the frame. Position the 2x2s flush with the top of the legs. Position the 2x4s so the top is 4” from the bottom of the legs. Those three 2x4s at the bottom of the nightstand should all be 1/2″ from the ground when the frame is set right-side-up.

Attach with 2-1/2” pocket holes and screws. I placed the pocket holes on the bottom of the 2x2s and on the inside of the 2x4s. That provides the best support, as well as hiding the pocket holes as best as possible.
Next, add the side and back 1x12s to the nightstand.

Attach with 1-1/4” pocket holes and screws.
Step 3.
Add the middle 2×4 frame across the back of the nightstand. This is that middle 2×4 that I had attached at the beginning but then had to remove in order to position the 1×12 back correctly. Position it flush with the back 1×12.
Attach with 2-1/2” pocket holes and screws. Place pocket holes and screws on the bottom of the 2×4 in order to hide them.
I placed the pocket holes and screws on the inside of the frame in order to hide them in the final design.
Step 4.
Drill holes in the bottom of the 2×2 cross piece for rebar accents. Space the holes 3-5/8” apart from center to center.

I had ½” diameter rebar, so I used a ½” forstner bit to drill the holes. However, since the rebar gets somewhat bent up at the ends when it’s cut, it doesn’t fit exactly in a ½” slot. I tested a 5/8” bit, but that was too big. I ended up just moving the ½” bit around while drilling to make the opening slightly larger to fit the rebar.
Drill the holes approximately ½” deep. The rebar pieces are 12” long and the gap between the lower frame is 11”. So the rebar will extend into the top and bottom of the frame about ½”.
Do a few practice drills to see what will work for your rebar before you drill the actual 2x2s to avoid any major catastrophes 🙂
Next, drill the holes in the top of the 2×4 frame cross pieces. Again, space them 3-5/8” center-to-center.

I drilled these a little deeper (about 1”) so that I was able to insert the rebar into the frame after it was attached to the 2x2s.
Once you have drilled all the holes, insert rebar into the 2×2 cross pieces. You may have to hammer the rebar into place (I did a lot of hammering to get everything lined up correctly).

Position the 2×2 and rebar over the 2×4 framing and insert into place! Again, this may take some finagling and hammering to get the 2x2s and rebar positioned.

After everything is positioned, attach the 2x2s to the frame with 2-1/4” pocket holes and screws. Attach at the inside of the frame to hide the connection.

Step 5.
Build and attach the bottom shelf of the nightstand.
To build the bottom shelf: join two 1x8s from the bottom with wood glue and 1-1/4” pocket holes and screws.

Align the bottom shelf so that it is flush with the bottom frame of the nightstand and attach with 1-1/4” pocket holes and screws.

At this point, the nightstand was looking something like this:

Step 6.
Join the front framing to the nightstand. Start with the front legs, then add the cross 2x4s.

Check, check, recheck for square.
I struggled to get everything square, but after lots of pushing and pulling and holding, I got it there … I always have trouble getting things square …
Attach the front frame the same as the back frame: 2-1/4” pocket holes and screws from the 2×2 and 2×4 cross pieces, 1-1/4” pocket holes and screws from the side 1x12s and bottom shelf.
Step 7.
Build and attach the top shelf of the nightstand.
To build the top shelf: join 4 1x6s from the bottom with wood glue and 1-1/4” pocket holes and screws.
Align the top shelf so that it is flush with the back of the nightstand and has a ½” overhang on the sides and front of the nightstand. Attach with wood glue and 1-1/4” pocket holes and screws from the bottom side in order to hide the connection.

Here’s a look at the inside of the nightstand where you can see the ridiculous number of pocket holes I have going on for all the connections:

And once the wood glue had dried:

Drawer.
To add the drawer to this nightstand, I used a tutorial from Build-Basic.com. You can find the tutorial at from Jenn at Build Basic.
To modify the dimensions to fit this nightstand: use a 1×10 for the drawer sides, 1/4″ plywood for the base, and a 1×12 as the drawer face.

All drawer hardware can be found at Home Depot.
Let me know if you have any questions and I’ll get back to you as soon as possible!
And please do share any builds based on these plans! I’d love to see it.
![]()
![]()


Devon McKnight
Sunday 11th of October 2020
Hi there, I really love the look of these bed side tables. Unfortunately the link to the plans is broken on my end and it leads to a spam website. Is there a way you could email me a copy of those plans? Thank you so much! - Devon
tylynn_sattler
Thursday 15th of October 2020
Wow - thanks for calling that to my attention. So sorry about that! I just updated the link and it should take you to the pdf. Here is the direct link as well: https://tylynnm.com/wp-content/uploads/2020/10/DIY-Rebar-Nightstand-Plans.pdf